Sadly, a great deal of water has passed under the bridge since my last entry. I guess I haven't had a lot of thoughts worth posting since then.
That's not completely true. In October I met Janice at a church meeting. I've spent a lot of time since then traveling with her, and generally enjoying her company. While that has taken a lot of time, it isn't the only thing I've done.
I hate to admit that the beautiful plane cabinet I built last summer is still sitting in my garage with the packing blankets covering it. I've made no progress on it directly. I still have to attach the back, attach a French cleat, and then get some help to move it to my shop and lift it up on the wall. I have a spot all ready for it on the wall in the upstairs part of the shop.
The box has had a lot of "oohs and ahhhs", but I haven't yet made another one.
However, I took a week-long course in Marquetry in April, and I really enjoyed it. So, what I'd like to do now is continue making boxes, but adding Marquetry to them. I'm currently working on making a veneer press, although lack of that shouldn't be a hindrance to doing small veneering projects.
Another thing which took an inordinate amount of time, beginning in October. One of my Naval Academy classmates lamented the fact that a lot of our classmates are not involved in communicating with each other. We have a couple of Yahoo Groups, and some classmates use them (a lot); others "lurk". Jack wanted a new program which would enroll all living members of the class, and that would be a place where they would enjoy sharing things.
So, I took the challenge, and set up a trial version of an online forum website. I evidently did a good sales job, because it was accepted by the class Executive Committee. I started building it. I faced lots of challenges, including fulfilling some of the requirements Jack had set. For example, forum sites usually depend on people subscribing because they are interested in a subject discussed on the forums. The software doesn't provide for mass-subscriptions. Jack wanted all classmates to be subscribed and then notified that they had been subscribed. That took me a significant amount of time to figure out, although I did gain some interesting experience accessing Excel spreadsheets with the Python programming language.
We made the site go live and announced it to the class in January to definitely mixed responses. Some really liked it. Some hated it and couldn't see why we should do it, and didn't hold back in telling me how much they disliked the whole concept. Many seem to have stayed away in droves.
As I age, I definitely am losing stamina. I used to walk a lot, but as time has gone on, I have been unable to walk much at all. First my feel started to hurt, and then they felt swollen all the time. Then my left knee began hurting, and then my left hip. Janice and I went to New Orleans in late January, just before Mardi Gra. We did several walking tours, and I really had a hard time with it.
I've since consulted a Rheumatologist. The diagnosis for some of the pain is osteoarthritis. The doctor has put me on some meds which seem to help with the pain (no, not an opioid. I've already dealt with that problem) and also prescribed physical therapy. That has also seemed to help. I still get stiff when I have been sitting for a long time, such as in a car on a trip. But it's much better. I've started doing Yoga again, and plan to get back to the exercise regimen I was doing before the pain got to be too much.
Friday, June 3, 2016
Wednesday, September 2, 2015
Closing out the CFC chapter
The 11th week was spent working on "the box", as it had become to be known throughout the shop. I routed mortises for the special quadrant hinges, and also fitted the box lock into a groove on the front. The escutcheon for the keyhole was a simple stamped brass thing which I discarded. Adrian, my instructor, showed me how to make a much nicer one using a piece of 1/8" brass. I made it, and epoxied it into the front of the box.
The outside of the box is coated with three coats of an oil / poly finish. I polished the final coat with a 4000 grit sanding disk.
Also, during the 11th week, we had a class project to make a wooden plane for veneer jointing. This project was done after hours and during lunch time. I finished my plane and used it by Monday of the 12th week. If you look closely at the pictures of the interior of my plane cabinet below, you will see the wooden plane to the left of the iron plane.
We worked hard the 12th week to finish up our projects. I started working on the plane 'till' I had originally designed two months ago. This was an added project, since I had completed the basic casework project weeks earlier.
First I re-sawed a piece of Cherry I had saved, making two pieces, each about 1/4" thick. Then I glued them together to make a panel to fit in the large opening of the plane cabinet.
I had planned for the panel to be held in the cabinet at an angle which was sufficient to keep the planes upright, but would give plenty of room for the totes (handles). What I had not designed was the method of keeping the panel at the correct angle in the box. So, at least a day was spent in trying out different techniques to support the panel at a shallow angle. It seems obvious now, but after a lot of fiddling around, my solution was to build a framework with two large Poplar right triangles cut at the appropriate angle, so that they would rest against the back panel of the box.
I built the frame and then glued the panel to it. I had to make a second set of triangles to back up the first one so that I could clamp the panel to the frame. Otherwise, the clamps would not work. They would just slip off the angled part.
Before I glued the panel to the framework, I had cut shallow grooves in the panel to accept Cherry strips to delineate where the planes would be set. Gluing in those strips, especially the two on the outer edges, proved to ber a real trial, and possibly the most frustrating thing I did during the entire 12 weeks. I tried at least five times to glue on the first strip. While I could get the clamps on when I did a dry trial run, as soon as I put glue on the strip, it would slip. Either the strip would be gapped from the crosspiece to which it was supposed to be flush, or it would slip sideways, or the whole thing would "explode" as all the clamps lost grip and fell off.
Christophe, seeing my extreme frustration (it was pretty obvious: I threw a clamp across the shop) suggested burying pins in the strips so they wouldn't move. I hammered some short brads into the edge of the panel, cut off their heads, and sharpened the ends to a point. Then I placed the strip in place and used light mallet taps to set it. I removed it, spread glue, and clamped it up. It worked! Thanks, Christophe. My mistake was waiting to glue in the strips until after I had glued the panel to the frame. Had I glued them on first, it would have been much easier. Lesson learned.
I finished gluing on the rest of the strips and fitting the whole assembly into the box by the time we had to stop work Thursday afternoon.
Once work stopped, we cleaned up the drawing room and moved in all of our projects so that we could display them for the faculty, other students, and the general population and tourists who might be visiting.
Each student gave a short talk about who they were, why they were at the school, and what they had accomplished while there. I have to say that my classmates created some remarkable pieces of furniture during the course.
I revealed the secret of my "Palindrome Box." Can you tell me what it is? If you can, let me know privately.
After the 'show and tell' session, we turned the drawing room into a photography studio, and Tim Hogan, a member of our class who is a professional photographer , took pictures of everyone's project. Here are the ones he took of my cabinet and box. Thanks, Tim.
 | ||
| Me and my plane cabinet |

 |
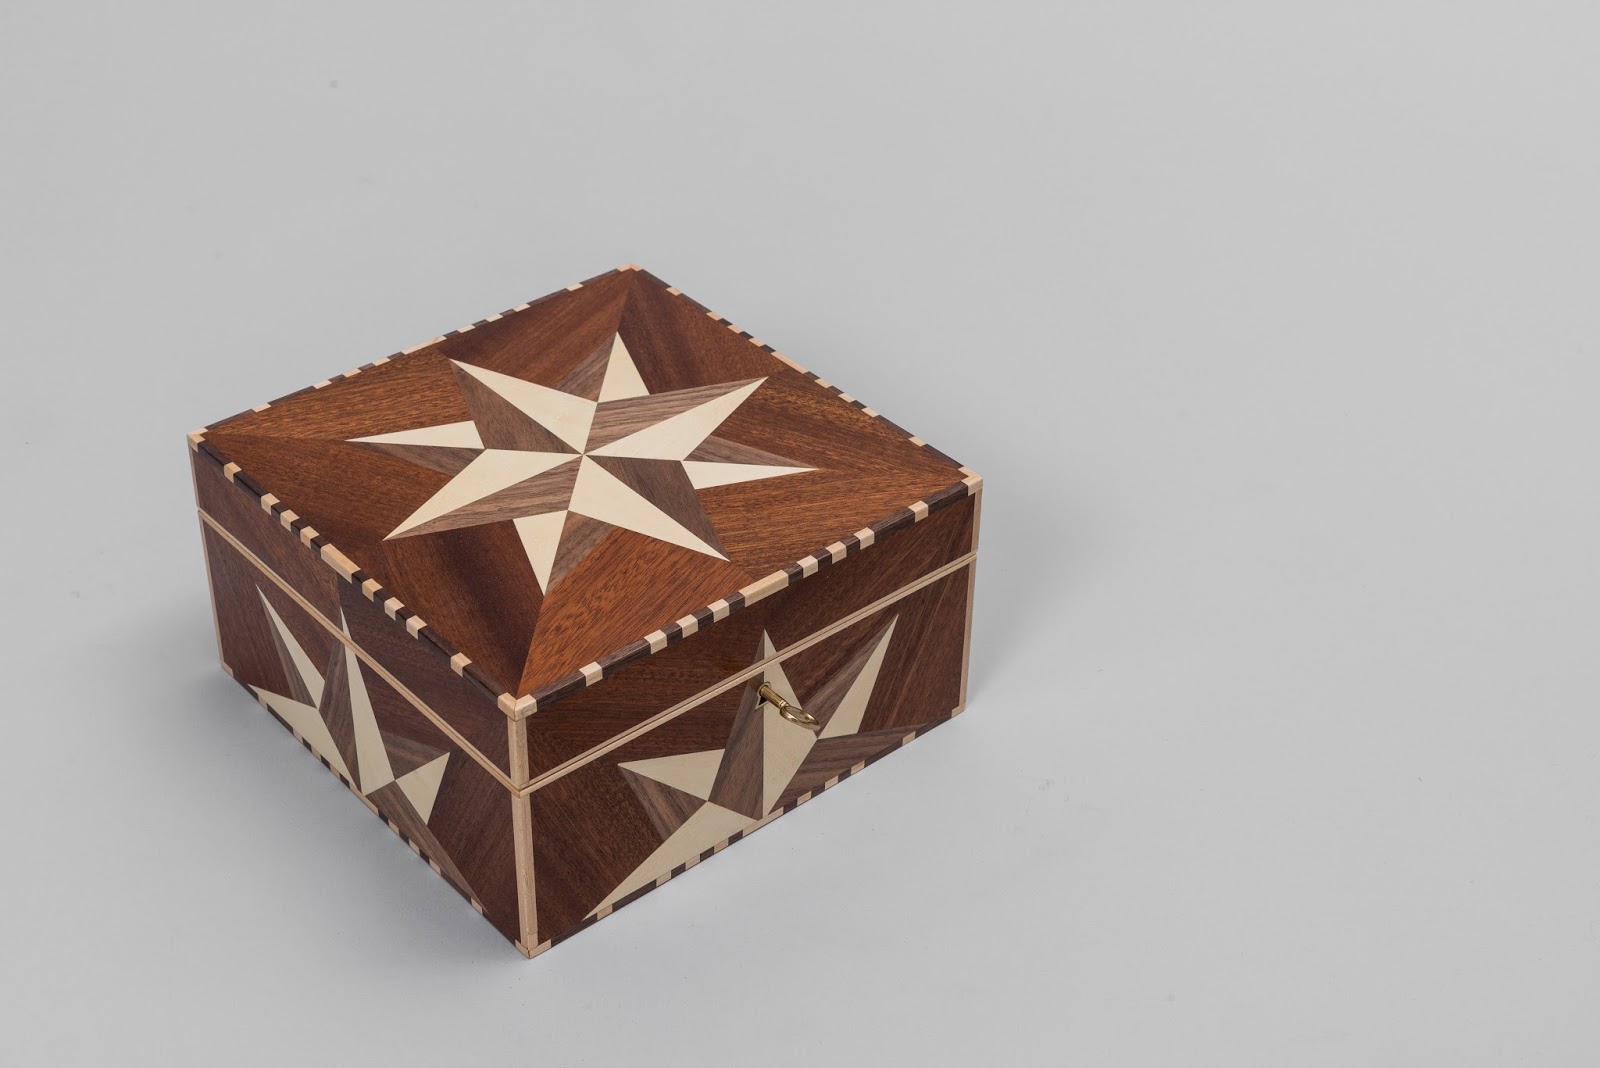 |
| The Palindrome Box |

Friday, we cleaned out all of our stuff, and returned the entire building back to the way we found it when we arrived in June. In the evening, we met at a local pizza place and celebrated our survival of the Twelve Week Intensive Furniture course at the Center for Furniture Craftsmanship.
I packed up the truck and took off Saturday morning for North Carolina, arriving home late Sunday evening.
Sunday, August 16, 2015
Week 10: Building a box
My last report was written Monday, and now another week has quickly passed by. The last thing I had completed on my box was pressing the veneers onto Baltic Birch plywood substrates.
You should understand that building my box is not the only activity I'm doing. During the past two weeks we've had demonstrations of various wood-bending methods (steam, lamination, brute force...), veneer pressing and other techniques. There's just so much stuff we are learning, that I decided to focus on what I am doing for my current project.
Tuesday I cut the substrates apart, leaving me with the four sides, a top and a bottom for the box, all oversized in all dimensions. The reverse faces of the top and four box sides were veneered with plain mahogany, as were both faces of the bottom piece.
I trimmed the sides to size on the table saw and then cut a rabbet on one end of each side piece. When the sides were dry assembled, the rabbets left a 1/8-inch groove on each corner of the box.
I had originally had a very complex plan for the trim around the edges of the box. I spent a lot of time trying to figure out how to cut out some 250 1/4-inch cubes of walnut and maple to glue up a pseudo-random pattern. I tried cutting the cubes on a table saw, and very quickly recognized that was more dangerous than I wanted to try, so I next tried to do it on a bandsaw. The problem with that was that faces of the cubes I cut on the bandsaw were too rough, and I would have had to spend an inordinate amount of time sanding them. I even went so far as to design a jig to hold the individual 1/4-inch cubes to sand them. Then I tried cutting them by hand. That was equally fruitless.
My solution was to back off from the random pattern, and to develop a more regular pattern. I cut some 1/4-inch by 1/4-inch and 3/4-inch by 1/4-inch sticks from walnut and maple, and then arranged them in a pleasing (to me!) alternating pattern. Then I glued them together. Once the glue dried, I was able to cut the assembly into 1/4-inch (chop)sticks which were just longer than a box side.
The next step was to glue up the four sides of the box after I had "pre-finished" them with three coats of shellac on the inside only.
Wednesday, after gluing the box sides together, and letting the glue dry for several hours, I trimmed the top and bottom pieces to size to fit in the top and bottom rabbets on the sides. This was particularly tricky for the top because I had to cut the piece to fit in the rabbet on the top of the sides, and the star had to be centered, and the veneer joints had to bisect the box sides at the same place as the star points on the sides. Usually when you cut something like this you rely on a squared edge on the workpiece to which you reference all your cuts. Because of the way the top and bottom pieces were made, I didn't have such a reference edge to work from. Instead, I used a technique we had been shown the previous week in which the blade of the table saw is embedded into a sacrificial/auxiliary fence is clamped to the regular saw fence and raised just higher than the thickness of the piece to be cut. The fence is on the right of the saw blade, with the blade embedded so that its left side is flush with the left edge of the sacrificial fence. I scribed the cut lines on the piece to center the star, and then laid a push block on top of the piece so that the right edge of the push block was right on the cut line. The push block now became my reference edge. The push block was thick enough so that its edge would ride on the auxiliary fence. This allowed the workpiece to be safely and accurately cut on an essentially arbitrary line.
I hope all that made some sense. I know that I was amazed at the idea when Adrian first demonstrated it. I took a bunch of pictures of the process, but looking back at them I realize that they wouldn't mean anything to anyone else, even with the explanation above.
The result of all that stuff was a successful cut of the top. Only one cut was slightly off, probably due to some slippage, and I was able to correct that with some plane work.
The bottom was much easier to cut to size because it was just veneered on both sides with solid mahogany veneer.
After trimming the pieces, I gave them three coats of shellac on the inside faces.
Thursday morning I glued in the bottom of the box. Then, a disaster of sorts occurred. Adrian had told me to set up the router table and rout the corners of the sides of the box to 3/16 inch. The purpose of this was to enlarge the existing corner rabbet and clean up any glue squeeze out and smooth the edges in preparation for gluing in the edge strips.
I misunderstood the instruction. I set up the router table to cut a 3/16 X 3/16-inch rabbet, which was correct, and I then cut the rabbit around the bottom of the sides, which was not correct, but was not the primary concern. I had forgotten to set a zero-clearance fence on the router table, and as a consequence, the veneer on the bottom of the box suffered terrible chip-out. There goes my project, I thought. Fortunately, the veneer on the bottom of the box is just plain mahogany veneer, and doesn't have the difficult to make pattern. So, my next task was to send the box through the large jointer and shear off the bottom veneer. Then I had to cut a new piece, glue in on, and set the box aside while the glue dried. A couple of hours wasted on an unnecessary step.
In the meantime, I decided to modify my trim plan again and use plain maple on the four corners of the box. I decided this because I didn't quite have enough of the maple/walnut trim made, and also I couldn't figure out how best to place the trim on the corners so that it wouldn't be ruined when the top was cut off the box. (The box is constructed by gluing all 6 pieces together, and then cutting off the top.)
I took the box out of the clamps after a couple of hours of drying time for the bottom veneer glue-up, and then glued on the top.
Next, I glued four pieces of 1/4 X 1/4-inch maple into the corner grooves. That was followed the job of planing the oversize pieces so that they were flush with the sides.


On Friday I cut the rabbits between the top and bottom edges and the sides, that I had mistakenly started to do Thursday. In addition to leaving a place for the top and bottom to be glued in, this also neatly trimmed the tops and bottoms of the corner trim pieces to size.
Most of Friday was devoted to mitering and gluing in the maple/walnut trim around the top and bottom edges of the box. After each strip was fitted and glued in, it had to be planed flush with the surfaces of the box. The first two strips on top and bottom were relatively easy to do, but the remaining two top and bottom pieces had to be mitered carefully to fit the miters of the pieces already glued in. This was extremely time-consuming and took all day Friday to fit six of the eight strips.
I could have finished the other two strips by late Friday, but I left school early (5 PM) to go back to my apartment. I'd invited Margo, my landlady, to dinner, so I had to get cleaned up.
Dinner, by the way, was great. Nice company, good conversation, good wine, good food. But I was exhausted. Not too long after I got home after dinner, I went to bed and started to read. The next thing I knew it was 3 AM, and the lights were still on.
Saturday I went in to the school around lunch time, and spent another few hours fitting, mitering, and gluing in the remaining two pieces of trim.
After that, I spent an hour or so with a card scraper getting everything clean and flush. One minor difficulty was that the mahogany veneer is much more porous than either the walnut or the holly. When the veneer was glued to the substrate in the vacuum press, a lot of glue squeezed through the veneer and dried on the surface, causing dark splotches. Some of that glue was very difficult to remove. There are still some to be further scraped and sanded on Monday.
I expect to cut off the top on Monday. Then the exposed edges will have to be trimmed with maple strips. Also, I've ordered the brass hinges and box lock which will have to be installed when they arrive some time next week.
Stay tuned!
You should understand that building my box is not the only activity I'm doing. During the past two weeks we've had demonstrations of various wood-bending methods (steam, lamination, brute force...), veneer pressing and other techniques. There's just so much stuff we are learning, that I decided to focus on what I am doing for my current project.
Tuesday I cut the substrates apart, leaving me with the four sides, a top and a bottom for the box, all oversized in all dimensions. The reverse faces of the top and four box sides were veneered with plain mahogany, as were both faces of the bottom piece.
I trimmed the sides to size on the table saw and then cut a rabbet on one end of each side piece. When the sides were dry assembled, the rabbets left a 1/8-inch groove on each corner of the box.
I had originally had a very complex plan for the trim around the edges of the box. I spent a lot of time trying to figure out how to cut out some 250 1/4-inch cubes of walnut and maple to glue up a pseudo-random pattern. I tried cutting the cubes on a table saw, and very quickly recognized that was more dangerous than I wanted to try, so I next tried to do it on a bandsaw. The problem with that was that faces of the cubes I cut on the bandsaw were too rough, and I would have had to spend an inordinate amount of time sanding them. I even went so far as to design a jig to hold the individual 1/4-inch cubes to sand them. Then I tried cutting them by hand. That was equally fruitless.
My solution was to back off from the random pattern, and to develop a more regular pattern. I cut some 1/4-inch by 1/4-inch and 3/4-inch by 1/4-inch sticks from walnut and maple, and then arranged them in a pleasing (to me!) alternating pattern. Then I glued them together. Once the glue dried, I was able to cut the assembly into 1/4-inch (chop)sticks which were just longer than a box side.
The next step was to glue up the four sides of the box after I had "pre-finished" them with three coats of shellac on the inside only.
 |
| The box sides in clamps during glue-up. The box has been carefully checked for "squareness" so that the top and bottom pieces will be assured of fitting. |
 |
| Another view with a pretty good look at the half star on one side. |
 |
| And another view |
 |
| A fourth view of the glue-up, showing the corner joint construction, and the rabbet cut on the inside of the edge for the eventual placement of the top |
 |
| Clamps removed and the parts sitting on my bench |
Wednesday, after gluing the box sides together, and letting the glue dry for several hours, I trimmed the top and bottom pieces to size to fit in the top and bottom rabbets on the sides. This was particularly tricky for the top because I had to cut the piece to fit in the rabbet on the top of the sides, and the star had to be centered, and the veneer joints had to bisect the box sides at the same place as the star points on the sides. Usually when you cut something like this you rely on a squared edge on the workpiece to which you reference all your cuts. Because of the way the top and bottom pieces were made, I didn't have such a reference edge to work from. Instead, I used a technique we had been shown the previous week in which the blade of the table saw is embedded into a sacrificial/auxiliary fence is clamped to the regular saw fence and raised just higher than the thickness of the piece to be cut. The fence is on the right of the saw blade, with the blade embedded so that its left side is flush with the left edge of the sacrificial fence. I scribed the cut lines on the piece to center the star, and then laid a push block on top of the piece so that the right edge of the push block was right on the cut line. The push block now became my reference edge. The push block was thick enough so that its edge would ride on the auxiliary fence. This allowed the workpiece to be safely and accurately cut on an essentially arbitrary line.
I hope all that made some sense. I know that I was amazed at the idea when Adrian first demonstrated it. I took a bunch of pictures of the process, but looking back at them I realize that they wouldn't mean anything to anyone else, even with the explanation above.
The result of all that stuff was a successful cut of the top. Only one cut was slightly off, probably due to some slippage, and I was able to correct that with some plane work.
The bottom was much easier to cut to size because it was just veneered on both sides with solid mahogany veneer.
After trimming the pieces, I gave them three coats of shellac on the inside faces.
 |
| Gluing on the bottom |
Thursday morning I glued in the bottom of the box. Then, a disaster of sorts occurred. Adrian had told me to set up the router table and rout the corners of the sides of the box to 3/16 inch. The purpose of this was to enlarge the existing corner rabbet and clean up any glue squeeze out and smooth the edges in preparation for gluing in the edge strips.
I misunderstood the instruction. I set up the router table to cut a 3/16 X 3/16-inch rabbet, which was correct, and I then cut the rabbit around the bottom of the sides, which was not correct, but was not the primary concern. I had forgotten to set a zero-clearance fence on the router table, and as a consequence, the veneer on the bottom of the box suffered terrible chip-out. There goes my project, I thought. Fortunately, the veneer on the bottom of the box is just plain mahogany veneer, and doesn't have the difficult to make pattern. So, my next task was to send the box through the large jointer and shear off the bottom veneer. Then I had to cut a new piece, glue in on, and set the box aside while the glue dried. A couple of hours wasted on an unnecessary step.
 |
| Gluing a new piece of veneer on the bottom. Somewhat more complex than just gluing on the bottom piece. |
In the meantime, I decided to modify my trim plan again and use plain maple on the four corners of the box. I decided this because I didn't quite have enough of the maple/walnut trim made, and also I couldn't figure out how best to place the trim on the corners so that it wouldn't be ruined when the top was cut off the box. (The box is constructed by gluing all 6 pieces together, and then cutting off the top.)
I took the box out of the clamps after a couple of hours of drying time for the bottom veneer glue-up, and then glued on the top.
Next, I glued four pieces of 1/4 X 1/4-inch maple into the corner grooves. That was followed the job of planing the oversize pieces so that they were flush with the sides.
 |
| Gluing strips of maple into rabbets on the box corners. |

 |
| Planing. You can see the glued-up edge trim strips in the lower left corner of the photo, waiting to be glued in around the top and bottom edges. |


 |
| I'm genuinely happy. |
Thanks to my classmate, Tim Hogan, for taking that series of photos of me.
On Friday I cut the rabbits between the top and bottom edges and the sides, that I had mistakenly started to do Thursday. In addition to leaving a place for the top and bottom to be glued in, this also neatly trimmed the tops and bottoms of the corner trim pieces to size.
Most of Friday was devoted to mitering and gluing in the maple/walnut trim around the top and bottom edges of the box. After each strip was fitted and glued in, it had to be planed flush with the surfaces of the box. The first two strips on top and bottom were relatively easy to do, but the remaining two top and bottom pieces had to be mitered carefully to fit the miters of the pieces already glued in. This was extremely time-consuming and took all day Friday to fit six of the eight strips.
 |
| Glueing the edge trim on the bottom of the box |
 |
| Two pieces glued on the top. |
I could have finished the other two strips by late Friday, but I left school early (5 PM) to go back to my apartment. I'd invited Margo, my landlady, to dinner, so I had to get cleaned up.
Dinner, by the way, was great. Nice company, good conversation, good wine, good food. But I was exhausted. Not too long after I got home after dinner, I went to bed and started to read. The next thing I knew it was 3 AM, and the lights were still on.
Saturday I went in to the school around lunch time, and spent another few hours fitting, mitering, and gluing in the remaining two pieces of trim.
After that, I spent an hour or so with a card scraper getting everything clean and flush. One minor difficulty was that the mahogany veneer is much more porous than either the walnut or the holly. When the veneer was glued to the substrate in the vacuum press, a lot of glue squeezed through the veneer and dried on the surface, causing dark splotches. Some of that glue was very difficult to remove. There are still some to be further scraped and sanded on Monday.
 |
| All the trim glued and trimmed, and the box has been scraped fairly clean, ready for the lid to be cut off |
I expect to cut off the top on Monday. Then the exposed edges will have to be trimmed with maple strips. Also, I've ordered the brass hinges and box lock which will have to be installed when they arrive some time next week.
Stay tuned!
Monday, August 10, 2015
Week Ten, Monday
This is going to be out of sequence, since I'm publishing it before my notes about the Ninth week, but my comments for last week grew to a huge size, and, because I finally got my camera back from Nikon, I took a bunch of pictures.
I wanted to get up to date on the project I'm currently working on. (The project on which I am currently working.)
For our latest projects, we were told that we should try to do at least one project for the final four weeks, but that we should try as many techniques as possible. At first I thought I would like to make something using bent wood. I went through several candidate projects, and nothing appealed to me. Then I saw some of the beautiful veneered boxes made by our new instructor, Adrian Ferrazzutti. While it isn't the same sort of design as his, I've come up with a design for an 8-pointed star, a compass rose.
I spent a lot of time figuring out how to design the star, and then decided that it was too hard to do and would take me too long. I went home that evening and worked on the design some more, and decided that it was what I wanted to do after all. I started working on it on Wednesday after I installed the knobs on my cabinet.
I didn't take photos of the process of building up the the stars (there are three - one full one for the top, and two which will be split in half for the four sides of the box), but I've taken a few photos after the fact so that I can sort of explain what I've accomplished so far.
Each star is split into eight sections, and each octant is made up of three pieces of veneer, two for half points, and one for the background, for a total of 72 pieces of veneer.
I first cut out the 72 pieces, in three different sizes using templates, and got out my plane to clean and square up the edges. Planing a piece of wood only 1/28 inch thick is an interesting exercise. It's done by laying the plane on its side and "shooting" the edge. It requires a great deal of care not to split the veneer or tearing it by planing against the grain.
The building process is one of "growing" the stars. The first process was to carefully glue and tape a background piece (the Mahogany) and half of one of the untrimmed smaller points together to make 24 new pieces. These were then again carefully planed, and each glued to one half of the larger point pieces (again, untrimmed). After this, I had 2 sets of twelve pieces, left and right parts of the large points.
I used a large amount of "blue tape." Each time I glued a joint, I would match the two pieces on one side, tape them by stretching one or more pieces of tape across the joint to pull it together. Then I would flip the assembly over, fold the joint back on the tape, and carefully spread a small amount of yellow glue on the two exposed edges. Then, I'd bring the edges back together, carefully scrape off any glue squeeze-out, and then tape that side. I often also ran the face of a hammer over the joint to make sure it was flat. Usually, because there was so little glue actually used, I could remove the tape and continue with the assembly within 10 minutes or less.
I now took each of the halves of the large points, planed the joints, cut across the large rectangle using the diagram as a guide, and then glued them together to make 12 pieces.
Then, the same thing again - cut, plane and glue - to make 6 half stars.
Then, again, cut, plane and glue, and I had three full stars.
Adrian said that it would get faster as I added pieces together. My experience was slightly different. As the pieces got larger, it took more and more care to cut the pieces and get them matched properly and properly planed so that there weren't any gaps, no matter how small. This took more time per part. Also, as the pieces got larger, it took longer to spread glue on the edges. The net result was fewer operations, but they were more involved and complicated.
There was a lot of picking and choosing to do for the last couple of steps. It got harder with each successive glue-up because the joints needed to be very precise. Your eye naturally goes to things where the corners don't quite come together. So, each glue-up evolution required a sorting/ranking. The top star, of course, had to be the most precise. I think I did pretty well on this. All of the joints match to less than a thirty-second of an inch. That's a visible error, but you have to look really hard. The other two stars are mostly correct but have acouple of small mismatches. Since they are going to be cut in half to make the sides, I'm hoping that I can choose well enough that the errors won't be noticable.
I started this part of the project last Wednesday morning after I finished installing the handles on my cabinet. Working almost continuously, I finished construction of the three stars Saturday afternoon.
I wanted to get up to date on the project I'm currently working on. (The project on which I am currently working.)
For our latest projects, we were told that we should try to do at least one project for the final four weeks, but that we should try as many techniques as possible. At first I thought I would like to make something using bent wood. I went through several candidate projects, and nothing appealed to me. Then I saw some of the beautiful veneered boxes made by our new instructor, Adrian Ferrazzutti. While it isn't the same sort of design as his, I've come up with a design for an 8-pointed star, a compass rose.
I spent a lot of time figuring out how to design the star, and then decided that it was too hard to do and would take me too long. I went home that evening and worked on the design some more, and decided that it was what I wanted to do after all. I started working on it on Wednesday after I installed the knobs on my cabinet.
 |
| The diagram I used to build the compass roses. Note, the woods used are Mahogany, Holly, and Walnut. |
Each star is split into eight sections, and each octant is made up of three pieces of veneer, two for half points, and one for the background, for a total of 72 pieces of veneer.
 |
| Packets of cut pieces used in the construction. There were 24 pieces of Mahogany, and 12 each of the large and small pieces of Walnut and Holly, a total of 72 pieces. |
I first cut out the 72 pieces, in three different sizes using templates, and got out my plane to clean and square up the edges. Planing a piece of wood only 1/28 inch thick is an interesting exercise. It's done by laying the plane on its side and "shooting" the edge. It requires a great deal of care not to split the veneer or tearing it by planing against the grain.
The building process is one of "growing" the stars. The first process was to carefully glue and tape a background piece (the Mahogany) and half of one of the untrimmed smaller points together to make 24 new pieces. These were then again carefully planed, and each glued to one half of the larger point pieces (again, untrimmed). After this, I had 2 sets of twelve pieces, left and right parts of the large points.
I used a large amount of "blue tape." Each time I glued a joint, I would match the two pieces on one side, tape them by stretching one or more pieces of tape across the joint to pull it together. Then I would flip the assembly over, fold the joint back on the tape, and carefully spread a small amount of yellow glue on the two exposed edges. Then, I'd bring the edges back together, carefully scrape off any glue squeeze-out, and then tape that side. I often also ran the face of a hammer over the joint to make sure it was flat. Usually, because there was so little glue actually used, I could remove the tape and continue with the assembly within 10 minutes or less.
 |
| An example of one the 24 initial assemblies. This one would eventually be the light side of a large point, and the dark side of a smaller point. |
Then, the same thing again - cut, plane and glue - to make 6 half stars.
Then, again, cut, plane and glue, and I had three full stars.
Adrian said that it would get faster as I added pieces together. My experience was slightly different. As the pieces got larger, it took more and more care to cut the pieces and get them matched properly and properly planed so that there weren't any gaps, no matter how small. This took more time per part. Also, as the pieces got larger, it took longer to spread glue on the edges. The net result was fewer operations, but they were more involved and complicated.
There was a lot of picking and choosing to do for the last couple of steps. It got harder with each successive glue-up because the joints needed to be very precise. Your eye naturally goes to things where the corners don't quite come together. So, each glue-up evolution required a sorting/ranking. The top star, of course, had to be the most precise. I think I did pretty well on this. All of the joints match to less than a thirty-second of an inch. That's a visible error, but you have to look really hard. The other two stars are mostly correct but have acouple of small mismatches. Since they are going to be cut in half to make the sides, I'm hoping that I can choose well enough that the errors won't be noticable.
I started this part of the project last Wednesday morning after I finished installing the handles on my cabinet. Working almost continuously, I finished construction of the three stars Saturday afternoon.
 |
| Here's the assembly I chose for the box top. It's the best of the three. |
 |
| These are the other two assemblies, slightly less perfect. |
This morning I continued the process.
First, I made a template about 8-1/2 inches square, with a 3/4 inch hole cut in the exact center. I had drawn lines on the template, and these I used to line the template up with the centers of the four large points. The hole was there so I could see the centers of the stars. I marked the edges of the template on the assemblies, and then cut away the waste.
 |
| The template used to cut the three assemblies to size. |
After I cut the three assemblies to size, I sawed in half the two stars that I had designated for the sides. Another "cringe" moment.
Next, I cut several boards which were intended to be used as "substrates" to which the assemblies would be glued. Eventually, those will become the actual top, bottom and sides of the box. I also cut two other boards from Masonite to act as glue cauls. These I wrapped in shipping tape (the annoying clear tape whose end gets lost. Yellow glue doesn't stick to it.) to act as a glue release. I also cut pieces of mahogany veneer to be glued to the backsides of the substrates. These will eventually be the inside of the box, and also the bottom. They also serve to counter the effects of moisture, etc. on the top and side veneers.
All the veneer pieces were attached to the substrates with veneer tape. Then yellow glue was spread on the substrates, and the veneers pressed into the glue. What a messy job.
The two substrates, two cauls, and several other boards and a plastic sheet were then sealed in a vacuum press bag, where they remained for several hours under a heavy vacuum.
At 5 pm I opened the vacuum bag and removed the assemblies. Some of the glue was still tacky, so I set the boards on edge with clamps to allow them to further dry over night. The idea of setting them on edge is to allow air to circulate around so that both front and back of the boards would dry evenly.
 |
| Veneer glued to substrates, just out of the vacuum press bag. In front is the top and bottom sections of the box, and the four side pieces are behind. |
The next step in the process is to cut the boards to size to build the box.
Sunday, August 2, 2015
Week Eight: Push to the end of the Case project
Since I took Saturday (the 25th) off, and I have a lot of things to finish up before the end of the case project phase of the course this coming Friday, I went to CFC (Center for Furniture Craftsmanship) rather than going to church Sunday morning.
Last Friday I finished cutting all the joints in the eight frame pieces for the cabinet doors. I started this morning by cutting the slots which will hold the door panels.
I have repeatedly been thankful that I made a model of the joint before I started in on the actual joints in the door frames. I set the table saw to cut my groove 3/8 inch deep and 1/2 inch from the outside edge of the frame pieces. This should put the slot in the mitered pieces so that the slot would not show. I ran one of the model pieces through the saw and realized that I had measured to the wrong side of the sawblade. It's an easy mistake to make and correct, but would have messed up the actual frame pieces.
Readjusting the saw fence, I cut a slot in all eight pieces. Then I readjusted the fence again, and widened the slot to 1/4 inch. The saw blade is 1/8" wide, so two parallel cuts is a simple way to make a 1/4" slot, but you have to do it on the correct side of the blade!
The next task was to make the panels. First I had to take a long look at the Cherry I had available. I had milled about 9 feet of wood from a new board last week and also had another 40 inches or so that was left from my book rack project.
I needed to make up two panels, both just under 30 inches long, with one just over 11 inches wide, and the other close to 17 inches wide. The wood I had available was all 9 to 10 inches wide. That meant that I would have to make both panels from glue ups.

It's easy enough to just grab four pieces of wood and glue them together, but I like to make the joints as nearly invisible as I can. This requires careful matching of the boards side by side, moving one relative to another to find places where the grain from one would blend into that of the other. I did a pretty good job on that with the Maple I used in the back, and wanted to do
 the same here.
I was disappointed that the piece left over from the book rack had a very different grain pattern, and a pinker color than the other boards. I think I commented on that when I had to re-make one of the drawer front pieces. By itself, the board looked fine, but I couldn't figure out any way that I could combine it with any of the other wood to make attractive glued up panels that didn't look odd, showing very obvious glued up and changing grain patterns.
By moving the boards around on my bench, doing a lot of measuring and drawings, I discovered that by choosing carefully, I could get both panels out of the long board, and wouldn't have to use the bookrack board. It required cutting about 1-1/2 inch off of two boards, and then taking one of the cut off pieces and gluing it to a third board. The first two boards went together beautifully.
So, I made all the cuts, planed the edges of the boards, and glued them all up to make the two panels I need for the doors.

Since I couldn't go any further today with the doors while the glue dried, I turned to fitting the drawers into the cabinet. That took a couple of hours of planing and testing until the two drawers would slide easily into their respective slots. The small drawer fit wonderfully - just slides in nicely. The larger drawer was still a little tight just as it was going into the cabinet all the way. I decided to set it aside and to work on it again later.
Then, I broke my own rule about doing the entire project with only hand tools. I cut the piece that will end up being the handle to length on the table saw. Then I cut the bottom piece to size also on the table saw. There's one more operation I will have to do with a power tool. I'll have to use the drill press to drill holes in the handle to make the hand hold, but I should be able to do all the remaining work on the project using only hand tools.
The last thing I did before leaving for the day was to plane the bottom piece so that it would fit in the slots cut in the side pieces, forming a box.

I glued up the doors and set them aside.

Then, I made a template to drill shelf bracket holes. This was done by sizing a piece of MDF to go inside the cabinet sides, and marking and drilling a series of 1/4 inch holes in the template, using a drill press.
After a lot of thought, I designed and made door handles. Since the cabinet will hold mostly planes, I figured out a shape that looks like a bench plane handle. I made a pattern and then a model piece which I worked on to make it look like a plane handle and still be a functional door handle. Using that as a template, I made two more from Maple. These I sanded and set aside for finishing.
Next I began finishing the drawer boxes, inside of the cabinet back and the door handles.
Finally, I cut mortises for hinges in the case. I deviated here from the way the rest of the class mortised their hinges. Everyone else used a small electric laminate trimmer to rout out the mortises for their hinges. I decided to do it all by hand, using a chisel and my router plane. This is a perfectly acceptable way of doing it, but it takes a lot longer. I started with a trial run on a scrap piece of maple, just so I knew the steps I was going to take. Then I cut the four mortises on the case. The whole job took me about an hour and a half, whereas those who used the machine did it in less than half that time. However, I like the sound of the router plane better than the buzz of the laminate trimmer, and I just generally enjoy using my hand tools.

In the afternoon, I fitted the doors to the case. As they were made about 1/16 inch oversized, this meant actually running the doors through the joiner several times, each time removing about 1/64 inch and then running back to my bench to see how the change had affected the fit. Finally I got them to fit very nicely, requiring only a bit of scraping and sanding.
So, next I scraped and cleaned up the doors.
Then, I cut the hinge mortises in the doors, again by hand. Next, I mounted the hinges on the doors and case, thereby mounting doors to the case. The hinges were mounted with brass screws. Unfortunately, although I was very careful, and waxed all the screws when I put them in, I stripped the Phillips head slots on two of them. I can't take the screws out without a lot of extra work. So, I'll have to do any finishing with the doors in place. That will be a little harder, but not insurmountable. And, it is what comes with being tired and in a hurry.
I decided on the location for the door handles. I had the help of a couple of my classmates, who very kindly held the cabinet up to the wall so that I could get an idea just where I would want the handles in "real life". I measured the doors to know where I wanted the handles, but I did not mount them.
Next, I mounted brass door catches for both doors. The latches that I bought were meant to be mounted in a slightly different manner than I had expected. However, after some experimentation with locations, and sticking the parts to the doors and the frames with double sided tape, I finally settled on a good location for the latches. I drilled the holes in mounted them. They work well, quietly grabbing and pulling doors closed.
I then drilled 1/4" shelf bracket holes with the template I had made several days earlier. Had to use a cordless drill with a right angle chuck to drill the holes because the 10-3/4 inch width of the shelving area was too narrow for a regular drill. Fortunately, I was able to borrow a very nice Festool drill from Yuri to do the job.
I moved the cabinet to the finishing area. This may have been a bit premature as I still have some work to do on the cabinet, but I am feeling the push to get it done or at least get as much done as I can before I have to drop the project because of the new phase of the coursework beginning next Monday.
I put a first coat of shellac finish on the entire cabinet.
Late in the afternoon I received knobs for the drawers. I'd ordered them a week or so ago. It's one of those things where I paid more for the shipping than the cost of the materials in order to get them quickly. I put a first coat of shellac on them.
Did some light sanding on the inside cabinet edges (which I had forgotten to do earlier).
I "broke" the edges on the cabinet doors, another thing I had forgotten to do before I starting finishing. No problem, as I only had one coat of shellac on the cabinet at this point.
I put on a second coat of shellac on the top, bottom, sides, doors, and inside door edges.
I made a "French Cleat" from a scrap of Maple. The French Cleat will be used to mount the cabinet on the wall in my shop. I already have the lower mounting rail in place in the shop. The part I made is the top part shown in the picture here.

I then made three shelf boards from remaining pieces of Maple. It's all gone now.
I understand that with the new skills/demos/projects of the remaining four weeks, I will not have either time or a place to finish the cabinet, so I am wraping it up now. May get in another coat of shellac on Monday morning.
I've received many compliments on the cabinet from other students, visiting tourists passing through the building, and from Peter Korn, the school Director.
Shaped the handle - hand hole and general shape - using rasps, spokeshave and sandpaper.
Remaining steps to complete this project include:
Glue up the project
Make plugs for holes in ends where bottom slot comes through and glue them in.
Scrape/sand the project
Put a finish on it.
It may never get to be finished as I've already started to use it to hold pencils, rulers, and other small tools I can never find under the junk on my bench.

Last Friday I finished cutting all the joints in the eight frame pieces for the cabinet doors. I started this morning by cutting the slots which will hold the door panels.
I have repeatedly been thankful that I made a model of the joint before I started in on the actual joints in the door frames. I set the table saw to cut my groove 3/8 inch deep and 1/2 inch from the outside edge of the frame pieces. This should put the slot in the mitered pieces so that the slot would not show. I ran one of the model pieces through the saw and realized that I had measured to the wrong side of the sawblade. It's an easy mistake to make and correct, but would have messed up the actual frame pieces.
Readjusting the saw fence, I cut a slot in all eight pieces. Then I readjusted the fence again, and widened the slot to 1/4 inch. The saw blade is 1/8" wide, so two parallel cuts is a simple way to make a 1/4" slot, but you have to do it on the correct side of the blade!
 |
| The side pieces for the doors, showing the newly cut slots. To the right is the test piece, and you can see the first, miscut slot. |
 |
| The two door frames, "dry" assembled (i.e., without glue) |
The next task was to make the panels. First I had to take a long look at the Cherry I had available. I had milled about 9 feet of wood from a new board last week and also had another 40 inches or so that was left from my book rack project.
I needed to make up two panels, both just under 30 inches long, with one just over 11 inches wide, and the other close to 17 inches wide. The wood I had available was all 9 to 10 inches wide. That meant that I would have to make both panels from glue ups.

It's easy enough to just grab four pieces of wood and glue them together, but I like to make the joints as nearly invisible as I can. This requires careful matching of the boards side by side, moving one relative to another to find places where the grain from one would blend into that of the other. I did a pretty good job on that with the Maple I used in the back, and wanted to do

I was disappointed that the piece left over from the book rack had a very different grain pattern, and a pinker color than the other boards. I think I commented on that when I had to re-make one of the drawer front pieces. By itself, the board looked fine, but I couldn't figure out any way that I could combine it with any of the other wood to make attractive glued up panels that didn't look odd, showing very obvious glued up and changing grain patterns.
By moving the boards around on my bench, doing a lot of measuring and drawings, I discovered that by choosing carefully, I could get both panels out of the long board, and wouldn't have to use the bookrack board. It required cutting about 1-1/2 inch off of two boards, and then taking one of the cut off pieces and gluing it to a third board. The first two boards went together beautifully.
So, I made all the cuts, planed the edges of the boards, and glued them all up to make the two panels I need for the doors.

Since I couldn't go any further today with the doors while the glue dried, I turned to fitting the drawers into the cabinet. That took a couple of hours of planing and testing until the two drawers would slide easily into their respective slots. The small drawer fit wonderfully - just slides in nicely. The larger drawer was still a little tight just as it was going into the cabinet all the way. I decided to set it aside and to work on it again later.
 |
| Planing one side of one of the drawers |
 |
| The larger drawer in its slot |
The Side Project
Finally, I worked some on my side project. First I cut a stopped dado in each end piece. This was an interesting exercise which permitted me to use my little router plane to get the bottom of the dados flat. I've had the little router plane for over a year, but have never used it. It will get used again later this week when I mount the doors to my plane cabinet.Then, I broke my own rule about doing the entire project with only hand tools. I cut the piece that will end up being the handle to length on the table saw. Then I cut the bottom piece to size also on the table saw. There's one more operation I will have to do with a power tool. I'll have to use the drill press to drill holes in the handle to make the hand hold, but I should be able to do all the remaining work on the project using only hand tools.
The last thing I did before leaving for the day was to plane the bottom piece so that it would fit in the slots cut in the side pieces, forming a box.

Tuesday
I continued with the doors. I completed all of the joints last week, and finished the panels today. I got them ready for gluing in the morning. |
| The doors dry assembled, ready for glue-up in the morning |
The final task of the day, which took a lot of time, and a lot of assistance from Austin, was to trim the back panel to fit in the case. I'm happy to say that it fits very well. In fact it is a nice tight fit.
 |
| The back panel is fitted into the cabinet |
Wednesday
Tension is growing in the shop. People are running back and forth between the bench room, the machine room, and the finishing room, usually with some piece of wood in their hands, and moving with head down and a determined stride. The doors between the machine shop and the bench room are swinging doors, and it sometimes seems that they are just swinging off their hinges as people pass through in both directions.
This activity is very stop and go. There are only so many machines available, so they must be shared. Also, Aaron left for a family function for the week. That left Austin as the lead instructor with Yuri to help him. I don't mean that we were getting "shortchanged" by Aaron not being there. Both Austin and Yuri are excellent woodworkers and instructors. Austin has a fine furniture making business in Miami, and is a graduate of the North Bennet Street School in Boston. Yuri was trained in woodworking in Japan, and teaches here in several fine arts schools in the US. She's currently working on her own projects under a fellowship at the school.
The problem is that two instructors spread over 12 peoples' queries and requests for assistance tends to mean a lot of waiting for their assistance. One of the reasons I started my "side project" was so I'd have something I could work on while waiting for assistance or for a machine to be freed up.
So, I continued toward the target of completion by Friday.

Then, I made a template to drill shelf bracket holes. This was done by sizing a piece of MDF to go inside the cabinet sides, and marking and drilling a series of 1/4 inch holes in the template, using a drill press.
After a lot of thought, I designed and made door handles. Since the cabinet will hold mostly planes, I figured out a shape that looks like a bench plane handle. I made a pattern and then a model piece which I worked on to make it look like a plane handle and still be a functional door handle. Using that as a template, I made two more from Maple. These I sanded and set aside for finishing.
Next I began finishing the drawer boxes, inside of the cabinet back and the door handles.
 |
| Starting to finish the handles, the inside of the back, and the drawers |
 |
| The handles |
 |
| The drawer boxes |
Finally, I cut mortises for hinges in the case. I deviated here from the way the rest of the class mortised their hinges. Everyone else used a small electric laminate trimmer to rout out the mortises for their hinges. I decided to do it all by hand, using a chisel and my router plane. This is a perfectly acceptable way of doing it, but it takes a lot longer. I started with a trial run on a scrap piece of maple, just so I knew the steps I was going to take. Then I cut the four mortises on the case. The whole job took me about an hour and a half, whereas those who used the machine did it in less than half that time. However, I like the sound of the router plane better than the buzz of the laminate trimmer, and I just generally enjoy using my hand tools.
Thursday
Yuri gave us long demonstration of a Japanese method of cutting sliding tapered dovetails. The demo took most of the morning. |
| Yuri demonstrates while Austin looks on. |
 |
| A vital part of the method |

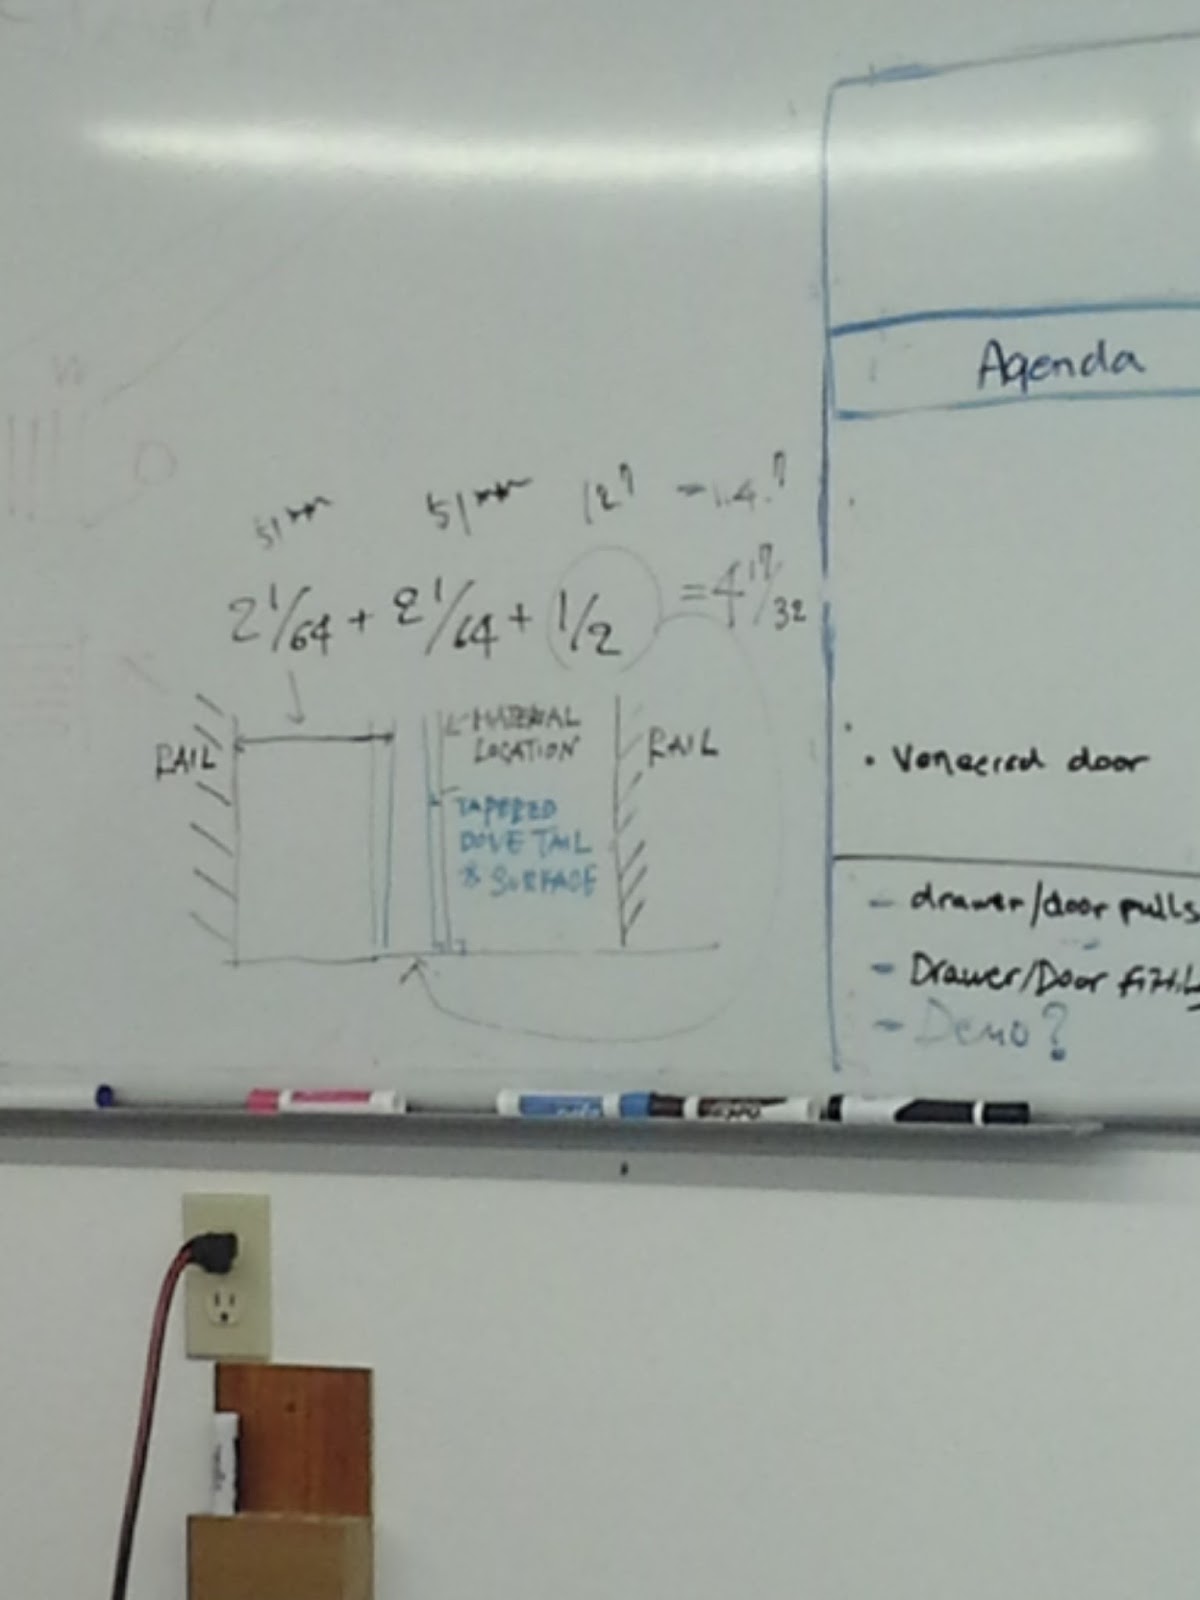 |
| Calculations for the method |
So, next I scraped and cleaned up the doors.
Then, I cut the hinge mortises in the doors, again by hand. Next, I mounted the hinges on the doors and case, thereby mounting doors to the case. The hinges were mounted with brass screws. Unfortunately, although I was very careful, and waxed all the screws when I put them in, I stripped the Phillips head slots on two of them. I can't take the screws out without a lot of extra work. So, I'll have to do any finishing with the doors in place. That will be a little harder, but not insurmountable. And, it is what comes with being tired and in a hurry.
Friday
I started the day by sanding the entire outer case, including the doors and back. That killed several hours.I decided on the location for the door handles. I had the help of a couple of my classmates, who very kindly held the cabinet up to the wall so that I could get an idea just where I would want the handles in "real life". I measured the doors to know where I wanted the handles, but I did not mount them.
 |
| Doors on, handles placed |
 |
| From the side |
Next, I mounted brass door catches for both doors. The latches that I bought were meant to be mounted in a slightly different manner than I had expected. However, after some experimentation with locations, and sticking the parts to the doors and the frames with double sided tape, I finally settled on a good location for the latches. I drilled the holes in mounted them. They work well, quietly grabbing and pulling doors closed.
I then drilled 1/4" shelf bracket holes with the template I had made several days earlier. Had to use a cordless drill with a right angle chuck to drill the holes because the 10-3/4 inch width of the shelving area was too narrow for a regular drill. Fortunately, I was able to borrow a very nice Festool drill from Yuri to do the job.
I moved the cabinet to the finishing area. This may have been a bit premature as I still have some work to do on the cabinet, but I am feeling the push to get it done or at least get as much done as I can before I have to drop the project because of the new phase of the coursework beginning next Monday.
I put a first coat of shellac finish on the entire cabinet.
Late in the afternoon I received knobs for the drawers. I'd ordered them a week or so ago. It's one of those things where I paid more for the shipping than the cost of the materials in order to get them quickly. I put a first coat of shellac on them.
Saturday
My original intention on Saturday was to drive to Portland, but I decided not to, and, after doing a small amount of cleaning of my apartment, I went to school.Did some light sanding on the inside cabinet edges (which I had forgotten to do earlier).
I "broke" the edges on the cabinet doors, another thing I had forgotten to do before I starting finishing. No problem, as I only had one coat of shellac on the cabinet at this point.
I put on a second coat of shellac on the top, bottom, sides, doors, and inside door edges.
I made a "French Cleat" from a scrap of Maple. The French Cleat will be used to mount the cabinet on the wall in my shop. I already have the lower mounting rail in place in the shop. The part I made is the top part shown in the picture here.

I then made three shelf boards from remaining pieces of Maple. It's all gone now.
I understand that with the new skills/demos/projects of the remaining four weeks, I will not have either time or a place to finish the cabinet, so I am wraping it up now. May get in another coat of shellac on Monday morning.
Things I still need to do:
- Mount knobs on drawers - They still need several coats of finish.
- Mount handles on doors - While I may drill the holes, I won't put the handles on the case for the trip home. It's too likely that they would be broken off during the trip in the bed of my truck.
- Fix a couple of minor joint and surface problems
- Mount the back in the cabinet (currently just friction fit).
- Oil finish the cabinet.
- Screw the French Cleat to the back.
I've received many compliments on the cabinet from other students, visiting tourists passing through the building, and from Peter Korn, the school Director.
Further work on my "side project."
Friday evening I cut the shoulders on the tenons on the handle which fit into the dados on the insides of the end pieces. The entire project now goes together tightly without glue.Shaped the handle - hand hole and general shape - using rasps, spokeshave and sandpaper.
Remaining steps to complete this project include:
Glue up the project
Make plugs for holes in ends where bottom slot comes through and glue them in.
Scrape/sand the project
Put a finish on it.
It may never get to be finished as I've already started to use it to hold pencils, rulers, and other small tools I can never find under the junk on my bench.
 |
| Dry fitted |

Subscribe to:
Comments (Atom)